Friday 28 December 2018

Toolkit 1: Autodesk Maya: Digital Set (Part 10)


For the final stages of the digital set tutorials, we had to create a more appropriate background using a sphere with a ramp applied to it so we could get a gradient effect into the sky. 


Splitting the scene and the sky onto different layers allowed us to prevent any colouration from the sky messing with the scene's colours and textures and for us to render them separately to composite in Photoshop.


Toolkit 1: Autodesk Maya: Digital Set (Part 9)


To finish the digital set tutorials, we had to add some extra textures to the chicken coop, barn, and ground. Here are the textures for each component:


Thursday 13 December 2018

What If Metropolis: Final Render


After receiving some feedback on which version I should use, I went back into Maya and re-rendered the final scene again (albeit with better samples). I compiled it with the matte painting again and made a few additional but minor changes to the final picture so the models and the painting would blend together a little bit better than the test renders. 

Wednesday 12 December 2018

What If Metropolis: Test Renders (Part 2; Complete)


I used Phil's feedback to attempt to get rid of the glare on the buildings to the right so they fit in with the rest of the scene better. I'm not sure which one to use, so feedback would be appreciated!

What If Metropolis: Test Renders (Part 1)


This is the matte painting integrated with one of the lighting tests (altered to be slightly dimmer). I put an overlay on top of the matte painting and tried my best to get rid of the jagged lines on the outside of the models. 

What If Metropolis: Lighting Tests


I did some lighting tests using different coloured lights. I think I'm most likely going to go with a light that is somewhere between the first and second pictures as I want to keep the shadows harsh instead of soft and barely visible. 

What If Metropolis: Matte Painting


This is the matte painting and its progress GIF for my scene. I did a rough test with a render to help with positioning/colouring/etc.:


Next, I'll do some lighting tests before compositing everything together and creating a final render.

What If Metropolis: Texturing (Part 2; Complete)


This morning, I made some adjustments to my textures. To begin with, I went in and updated the ground texture so the patterns are more defined and visible in the render, and I made some of the trees & their trunks darker to add a little bit of variation. For the rest of the textures, I made some changes to the specularity so they are shinier and have a glossier effect like Sherman's work. 

What If Metropolis: Pipeline: Texturing (Part 1)

For the textures on my scene, I decided to add a watercolour brush texture to create a grainy surface somewhat reminiscent of the paint marks used in Bruce M. Sherman's works. I'll probably keep the specular somewhat high on the final render for the buildings, as his works also have a slightly glossy effect to them. For this render, I kept it lower so the textures are more obvious.


This is the render with textures implemented:
Tomorrow, I will probably make some adjustments to these textures (namely the ground textures) so I can finish and implement my matte painting. I will also try and complete any final lighting tests and passes so the city is completed.

Monday 10 December 2018

What If Metropolis: Wireframe, Ambient Occlusion, and UV Map Passes


What If Metropolis: Base Colouring


Before I begin texturing my scene, I wanted to test out the base colours and see what it looked like. To do this, I picked out the colours from my concept art and put them into Photoshop. As the colours came out lighter in Maya, I needed to adjust the gamma correction so that Maya could pick the hues up correctly. 


Toolkit 1: Drawing: Session 7


What If Metropolis: Arranging the Scene


To start with, I opened my "Ground" file and began importing all of my individual key assets and roughly placing them where they should go according to my concept painting. I did the same with the street furniture as well.


I then began scaling them all to the right sizes and rotating/moving them into the correct position. Some of the street furniture required duplicating and I copied the building at the front on the left side of the screen and placed it at the back (as well as editing its model slightly so it wasn't exactly the same) to fill some of the blank space left behind. 


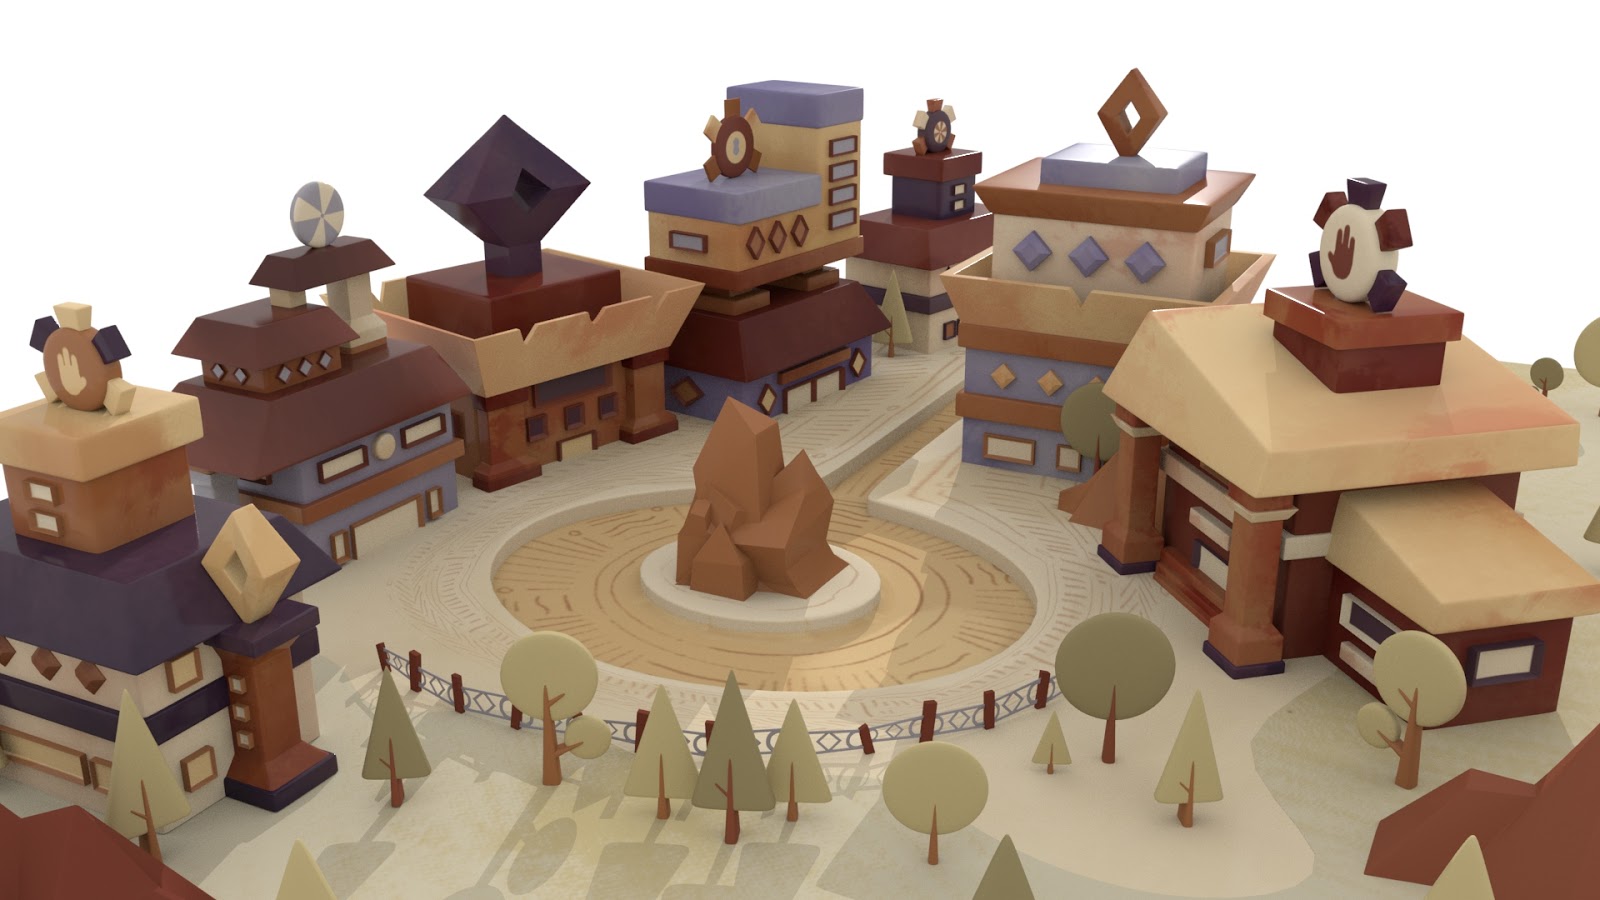
To make navigating the outliner easier, I grouped my objects into key assets and street furniture. I then created my camera and moved it into position so I could later use a temporary skydome light and a directional light. I turned the samples on both lights up to 3 and set the exposure to 1 so the lighting would be suitable, and completed a test render of my city so far: