Thursday 28 November 2019

Toolkit 2: Character Design: Turnarounds

These are the turnarounds for the main character/hero character, Buster.


Here are some closeups of the main four views;

Front


Left


Back


Right


Following these, I did turnarounds for the femme fatale/villainess/love interest character, Felicity.


Here are the main four angles:

Front


Left


Back


Right


Since I still haven't decided if the dress is made out of material as opposed to plastic, I did another brief turnaround of the character minus the dress to understand how her legs would work. Compared to Buster, she has more articulation in her fingers and slightly less in her legs/ankles.


Here are both characters together:


Wednesday 27 November 2019

Toolkit 2: Character Design: Session 8

Yesterday's character design session had us looking at perspective and animation layouts. For the first part of my lesson, I worked in my book to produce a room layout and two quick sketches that I redrew in Photoshop later on.


These two drawings are quick sketches of the bar's interior. I was struggling with the item placement even though making the room's layout from above helped me, so it took me a while to get rough sketches down before I began to put perspective lines in to make something a little more detailed and polished. 

I'm going to keep working on these to improve the perspective before I start to do that, and then I can put the characters into the scene.


Monday 25 November 2019

Toolkit 2: Drawing: Session 8

Since we didn't have a model for life drawing today, Simon gave us prompts to draw using a generator - we'd have to come up with drawings based on these ideas.


Toolkit 2: Autodesk Maya: Jetpack Jones: Head Modelling (Part 5)

This tutorial had me moving on to modelling the character's nose.


I'm going to tidy up the geometry around the eye, forehead, and cheek before I continue.

Sunday 24 November 2019

Toolkit 2: Character Design: Session 7

In last week's character design session, we looked at storyboarding. I took what I'd done and went over it roughly afterwards.

For the first part of the lesson, we had to study a scene with some kind of action taking place in it and look at the key shots. I decided to study a scene from the beginning of Treasure Planet where Jim is riding the solar surfer as it's a fast-paced scene with a lot of switching between shots. I didn't get the entire sequence done, but I feel I managed to pick out a few shots that show the energy of the scene.


We were then each given a location or prompt of some kind that we had to storyboard the key shots from. I was given a 'farm' and decided to storyboard some of the essential parts of a typical horror film cornfield chase scene involving a villain/killer and their victim. I broke it down into nine shots.

  • The scene would start with the typical backed-into-a-corner-style confrontation in a barn, wherein the villain walks into shot and startles the victim. 
  • The victim then escapes after briefly incapacitating or outwitting the villain and takes off running into the field. 
  • After this, there is a shot above the field that shows the barn, the victim running, the killer coming out of the barn, and the victim's destination or escape route, which would be a truck on the side of the road. It also shows the obstacle, which is the cornfield, and then a combine harvester-type vehicle that the villain would use to chase the victim through the field with. 
  • The villain, deciding it would be useless to pursue the victim by foot, notices the combine harvester to their side and the camera pans over. They start climbing into the combine harvester.
  • The next two shots has the victim running through the field at different shots; to heighten tension and as is typical in cornfield chase scenes (particularly in horror films), the victim is partially or mostly obscured as they are running. A subsequent close-up of their face to convey their fear follows, and the combine harvester can be heard approaching. If the scene is at night, this would be accompanied by the lights of the vehicle as well.
  • The victim would escape from the cornfield with the combine harvester still approaching out of shot. They would frantically approach and try to get into the truck, find the keys, and get in.
  • There would be a shot of the victim in here somewhere as they try to turn the key to the truck to get it to turn on - it isn't working, and the villain is still approaching. Between this shot and the next shot, the combine harvester switches off and the victim thinks they're safe.
  • The villain appears. This could be done by having them appear at the window of the truck (likely the window that the victim is sat near) or by slamming some kind of object through the roof.


After this, we continued with our projects. I ended up speaking to a few of my classmates and after some discussion and brief research, ended up naming the characters Buster and Felicity respectively so it'd be easier to address them.

Later, after speaking to Justin about my characters, I took his feedback into account and made some minor adjustments to them;

  • I changed the position of Buster's tail. 
  • I added some more articulation textures to emphasise the toy-like aspect of the characters.
  • I changed Felicity's hands to make them daintier and more slender as opposed to claw-like and outright violent.
  • I changed Felicity's jacket colours to better distinguish between the 'fluff' (which is actually a plastic shape) and her tail
I still have to decide how to work around Felicity's dress; whether it will be fabric as many dolls were dressed in in the according time period, or whether it will also be plastic.


I also went on to compile some images so I can start to look at the scenery of the place that the sequence will take place in. This involved looking at 1930's/40's and even modern clubs, diners, and cityscapes. The colour scheme was also important here so it'd fit with the aesthetic that I'm aiming for.


Saturday 23 November 2019

Toolkit 2: Lighting and Rendering: AOVs

Opening the scene in Maya and running a test render with Arnold to check the displacement maps.


Attempting to get the displacement maps to work again (as with the subsurface tutorial, I couldn't increase the height without the character swelling again despite using a different computer, so I'll revisit this later).


Adding a diffuse render to test the AOV function.


Removing the diffuse test to add and render an ID pass.


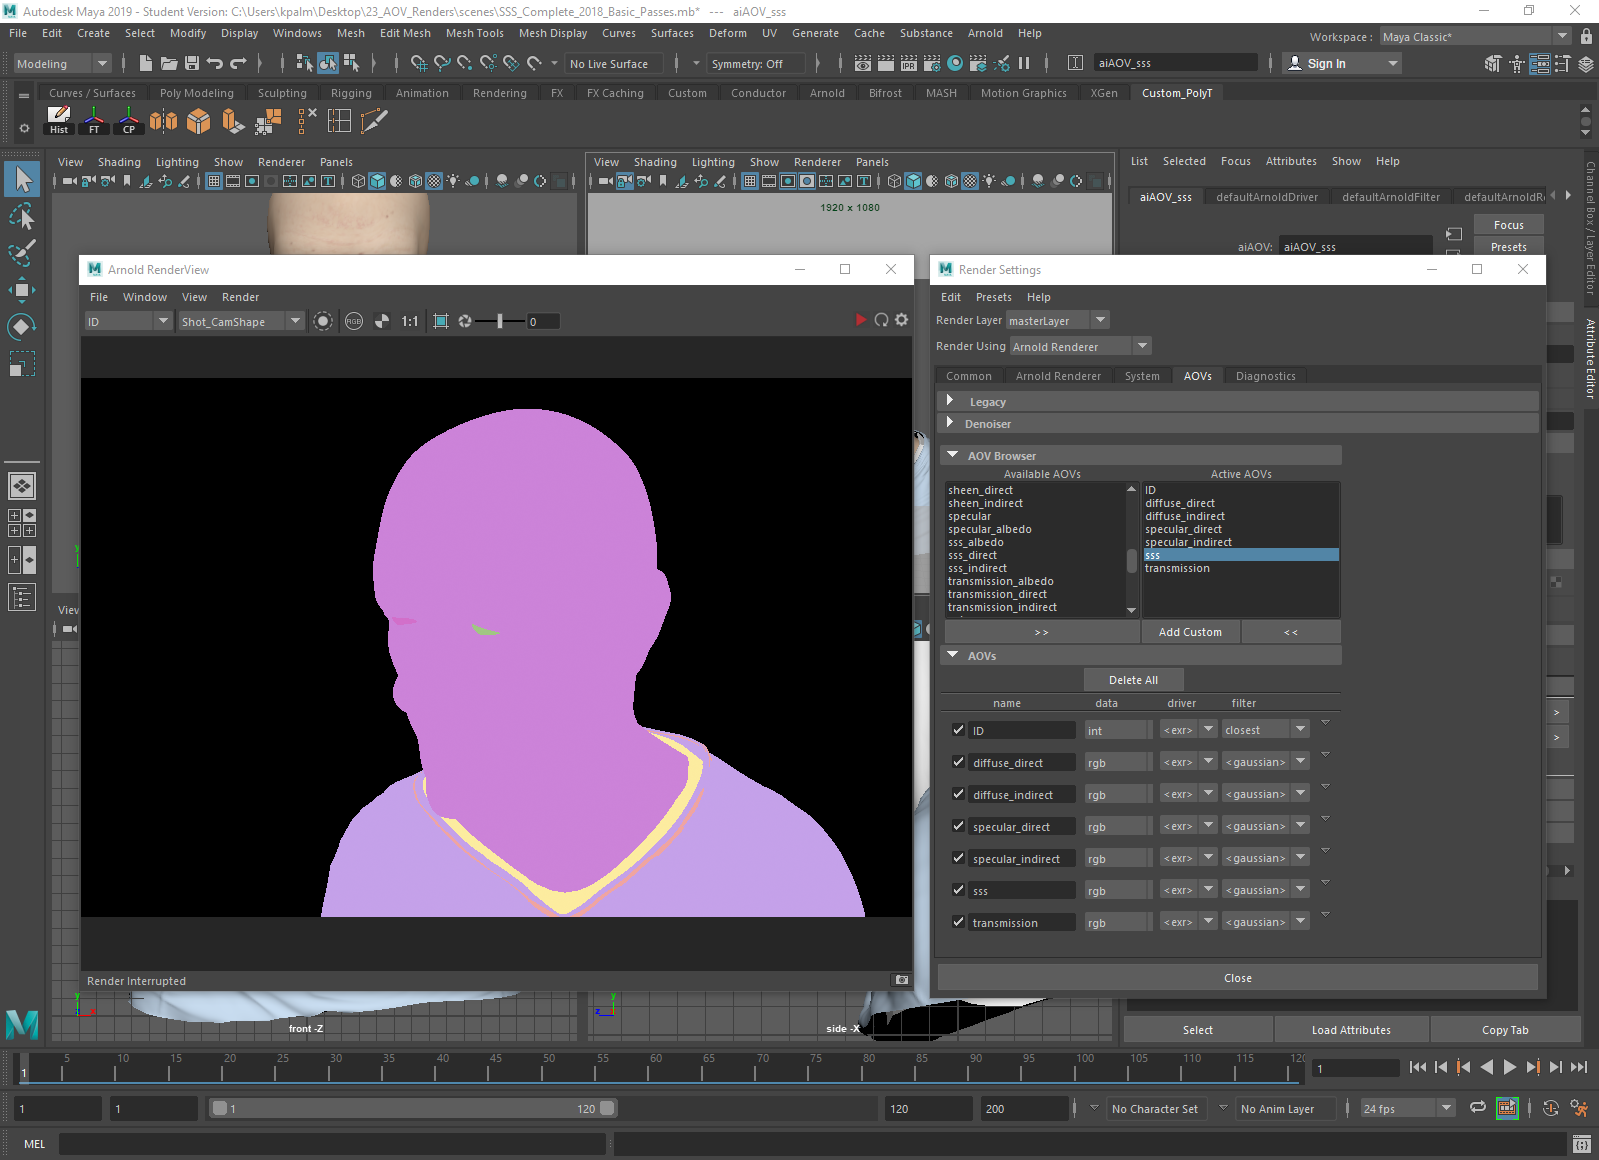
Adding in the other passes needed.


Creating a custom AOV for ambient occlusion.


After rendering the passes out as an .exr file, they are brought into After Effects.


Opening the EXtractoR and isolating the ambience occlusion pass.


Separating all of the passes into their own layers. 


Rearranging the layers.


Pre-composing everything.


Changing the colour space, setting up the second viewing window and changing the diffuse indirect layer mode to 'add'.


Changing the SSS layer to add.


Changing the specular direct and indirect layers to add.


Changing the transmission layer to add.


Changing the ambient occlusion layer's mode to multiply and lowering its opacity to 33%.


Adding brightness and contrast


Using the linear colour key tool and inverted track matte to isolate the left eye.


Using brightness and contrast to make the left eye brighter.


Isolating the right eye and making it brighter using the same method.


Opening the file in Photoshop.


The final result.